::(Warning) (Take note of the requirements for this process:)
• The groups (group set) must already exist in clickUP, before you use this process.
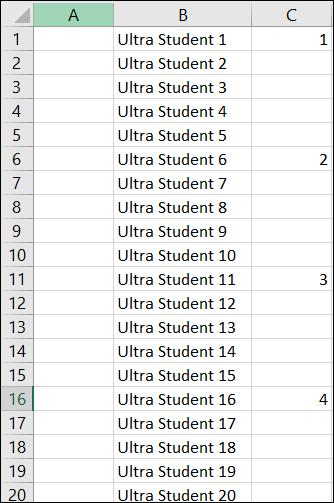
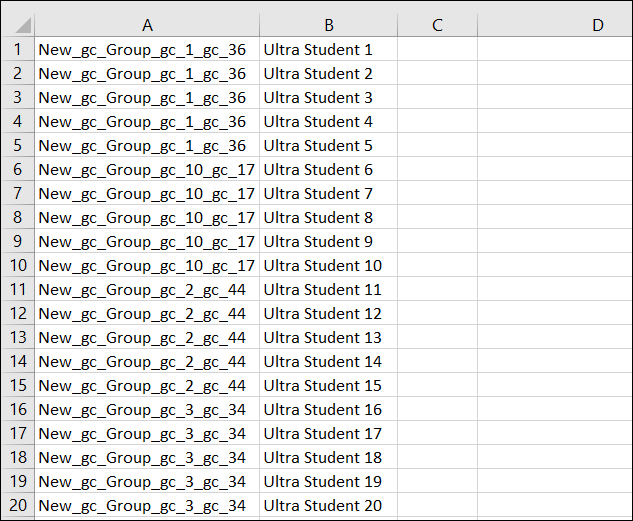
• Prepare an Excel sheet in which you group students together according to the groups they should be allocated to. The ustudent number must be listed in column B grouped according to the groups students need to be allocated to. The group number/name that the students should be allocated to, should be listed in column C of the spreadsheet.
• Under no circumstances change the Group Code, copy and paste it; or drag it down in Excel
:::
A. Export a group set from clickUP
-
Click on the Groups tab to access the Groups environment.
-
On the Course Groups page, scroll down the list of group sets, scroll to the group set you want to work on.

-
Click on the ellipse to the right of the group set name.

-
From the drop down menu, click on Export.

-
Select Create a file; then under *Select the fields you would like to export select Group sets only. Leave File Type as Comma Separated Value (.csv) and then click on Export File. Note: we asume that no students have been allocated to groups.

-
You may receive a message Request sent (in clickUP). In your UP gmail account, you will receive an email indicating, file is now available for export. The Go to Course Groups link in the e-mail will take you to clickUP.

-
In clickUP, next to where you selected Create in step 4 above, you will see Export. Click on Export and the export file can be downloaded.
Tip: The download files are not time stamped (only date stamped) in their name. The newest download usually is at the top of the list. To avoid confusion, you may opt to click on the dustbin to delete the download file before doing another download of the same group set.

-
The file will be in .cvs format

-
Regarding the Exported file download:
- If you selected a singe file (e.g. Group sets only) a single file will download.
- If you selected 2 files (e.g. Group sets only and Members only), they will be in a zip folder.
- Take note where the Exported file(s) is (are) saved when you download them.
- When you do a number of downloads of the same group set, add a descriptor to the default download name e.g. 20230320150655_A group set to change group nemaes in Excel v1.scv
Now go to Excel and open the file you have just exported from clickUP
B. Process in Excel
-
Open the clickUP downloaded file. It is in CSV format, so you may be requested to click a number of times before it is opened.
-
The instructor also needs to open the student numbers and group allocation Excel sheet with the ustudent number in column B grouped according to the groups students need to be allocated to. This can be an indication in column C of the spread sheet. If the instructor has two screens, open an Excel document in each.
-
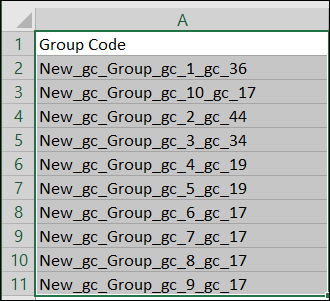
Go to the clickUP downloaded file, copy the Group Code in column A.
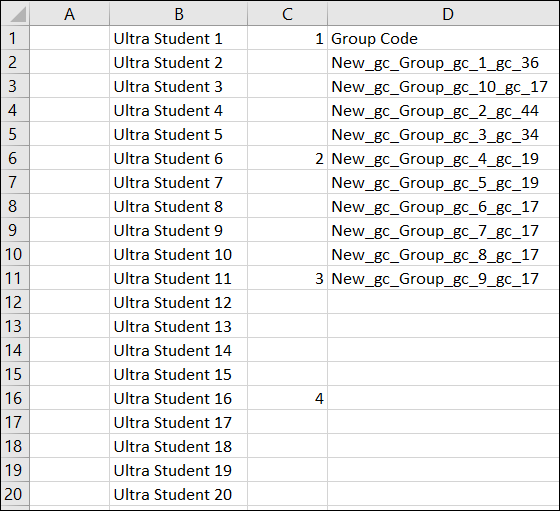
- Now switch to student numbers and group allocation Excel sheet and paste the selection of Group Code in Column D. This is done now, so that you do not have to move between the two documents to get the Group Code every time.
- Stay in the student numbers and group allocation Excel sheet, select for cut the first Group Code in column D.
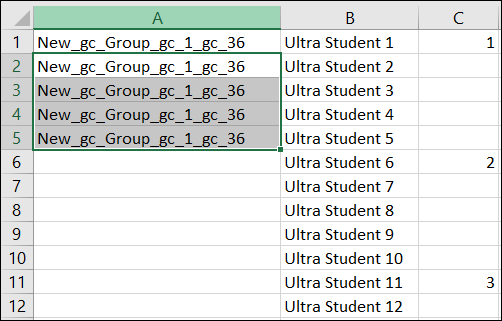
- Stay in the student numbers and group allocation Excel sheet, and paste the cut selection in the top cell (A1) of the spread sheet. Note the empty cell in column D.(Do not try to figure out the naming logic or the Group code - just copy and paste it.
-
With the first group code copied to cell 1A, copy the Group Code from there and paste in the column for all the members that need to be in the group. In the example until Cell 5A. (Do not drag down the Group Code as the last number will change).
-
Repeat step 13 and 14 until all the Group Code have been cut and pasted next to the groups. Clear columns C and D
-
Save the document as a .CSV file adding descriptor to distinguish from the first file, e.g. Example list of students to be uploaded with group codes.csv. Take note where the updated file is saved.
C. Import group members into clickUP
-
Under Details & Actions go to Course Groups and click View sets & groups.

-
On the Course Groups page, scroll down the list of group sets, scroll to the group set you want to work on.

- Click on the ellipse to the right of the group set name.

-
From the drop down menu, click on Edit.

-
Inside the chosen group set, the details of the group will show. Move your cursor to the right and click on the Upload icon

-
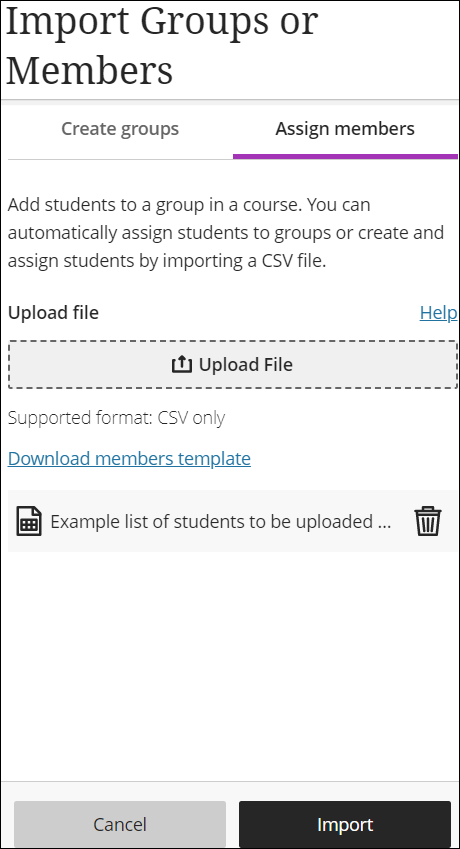
The Import Groups or Members screen will show with the Create groups selected at the top. Click on Assign members
-
Select the .csv file saved in step 16 above; verify you have selected the correct file and click on Import.
-
You will receive a warning message inside clickUP Large files may take longer to upload. You will receive a confirmation email when the upload is complete.

-
The email you will receive in your UP gmail address will confirm Your course groups import is now complete. There is a clickable link in the email you may use to take you to the Course groups page.

-
On the Course Groups page, scroll down the list of group sets, scroll to the group set you are working on. Click on the down arrow to the right of the ellipse.

-
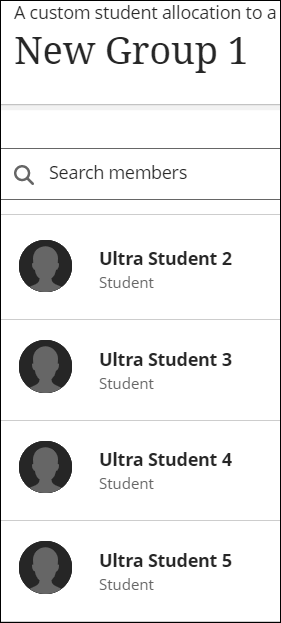
You can now verify that the groups have received students. You may have to refresh the screen for the changes to show.
- You can click on Show Members below a group to verify the students allocated to that group.

