Class Collaborate
  • 03 Oct 2024
  • 4 Minutes to read
  • Contributors
  • Dark
    Light
  • PDF

Class Collaborate

  • Dark
    Light
  • PDF

Article summary

This video will give you more information about the Class Collaborate interface:

Details & Actions menu moved

This video might still display the Details & Actions menu on the left side of the screen - it has since moved to the right hand side. Click here to see what it looks like.


Create sessions

  1. Go to Class Collaborate on the Details & Actions Menu.
  2. Click on the ellipses next to Join Session.
  3. The Course room is by default enabled. If you use the Course room for all your sessions, all the recording names will start with the module code, followed by the number of the recording, e.g. ABC 123_recording 1, ABC 123_recording 2.
  4. If you would like to control the names of your recordings, and alleviate extra work in renaming recordings, we advise the following:
    a. Click on Disable course room. (You only need to do this once in your course)
    b. Click on Manage all sessions to start creating a new session.
    Collaborate disable course room1
  5. A new layer will open. Click on Create session.
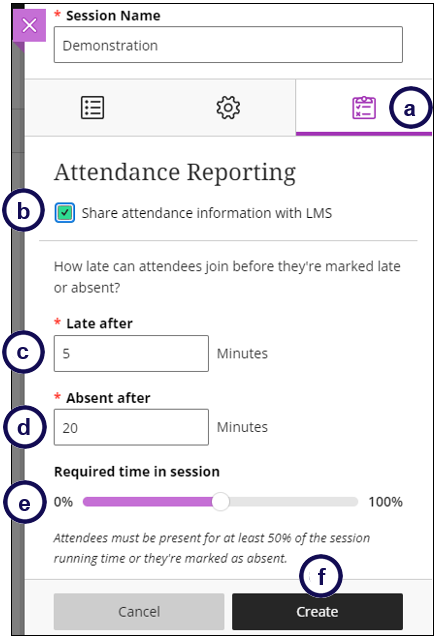
  6. Provide a descriptive name for the session and use the tabs below it to set the Event Details, settings you want to use during the session, and the attendance reporting.
  7. Click Create.
Note
  • Only use a guest link for users who are not part of your module.
  • If you want allow students to download recordings of the session to reuse later, remember to tick Allow recording downloads
  • Be careful with the use of anonymous chats, as students
  • If you have more than 250 students, tick Allow 250+ attendees to join. When you tick this, students can only use the chat function to engage, not the audio or video. If you want them to interact with audio, they will have to put up their hand, and then you can change their role to Presenter. Then the particulare student will be able to use their audio.
  • Tick USE AWS Chime for audio and video for better audio and video quality. (Only for sessions with less than 250 attendees.
  • Read the information in the yellow block below regarding attendance reporting.

Access and download recordings

Recorded sessions are saved as MP4s on the same page you joined your session from.

  1. Click on the ellipses to the right of Class Collaborate.

  2. Select View all recordings.
    collaborate1

  3. Click on the ellipses in the right column to view the recording options.

  4. Click on Watch now to watch the recording.

  5. Click on Copy link if you would like to make the link of relevant recording available in clickUP as a web link (temporary solution).

  6. Click on Download to download the recording to your own computer.
    Collaborate%20recording%20dropdown

Why should I download the recordings?

We encourage you to download the recordings as recordings will get deleted in the next semester to make space for new recordings in line with UP's contractual obligations.

  1. Upload the recording to YouTube:
8. Share the video link as a web link in your Ultra module (permanent solution).

Record attendance of virtual sessions

Attendance is automatically recorded within each virtual session. Take note of the following to ensure that your attendance reflects the correct information:

  1. To record student data correctly, they must log into the sessions from the clickUP module, NOT via a guest link.
  2. On the Attendance reporting tab of the session settings, add the number of minutes that will indicate a student as late or absent for the session, and set the required time that they have to be in the session to be marked present.
TAKE NOTE

The student attendance is calculated as percentage of the Total session length. Make sure not to schedule the sessions too long, as it could result in students being marked absent. E.g.
You schedule a session for 3 hours (8h00-11h00) and set the attendance to mark a student present if they were in the session for 50% of the time. This will require students to be in the session for at least 90 minutes.
On the day of the session, you only present the session from 8h00-9h00, and end the session. In this scenario, all students will be marked absent as they were only in the session for 60 minutes.

Record all Collaborate sessions' attendance in Attendance tool

If you want to have a record of all the sessions that students attended in one place, it will be a good idea to record attendance of a session within the Attendance tool of clickUP. This is done automatically if you set it up as follows:

  1. BEFORE you start with a Collaborate session, click on Record Attendance below Details & Actions on the left side.
  2. Click on the Settings wheel on the top right side of the screen.
  3. Tick Use attendance as a grade.
  4. Set the other values as needed, and Save.

image.png

Read more ....

Other virtual classrooms:

Large classes

Because of the limitation of the number of students in Class Collaborate, it is advised to schedule a Google Meet session with the students.

Share the Google meet link in your clickUP course.

Was this article helpful?

What's Next