An Assignment is defined as an assessment without questions (e.g. Multiple Choice Questions, Essay, Hotspot).
Assignments are always available to instructors.
You can create assignments alongside other content. Students can access their work next to the content they need, right when they need it. You can also create a group assignment and release it to one or more groups in your course.
On the Course Content page:
-
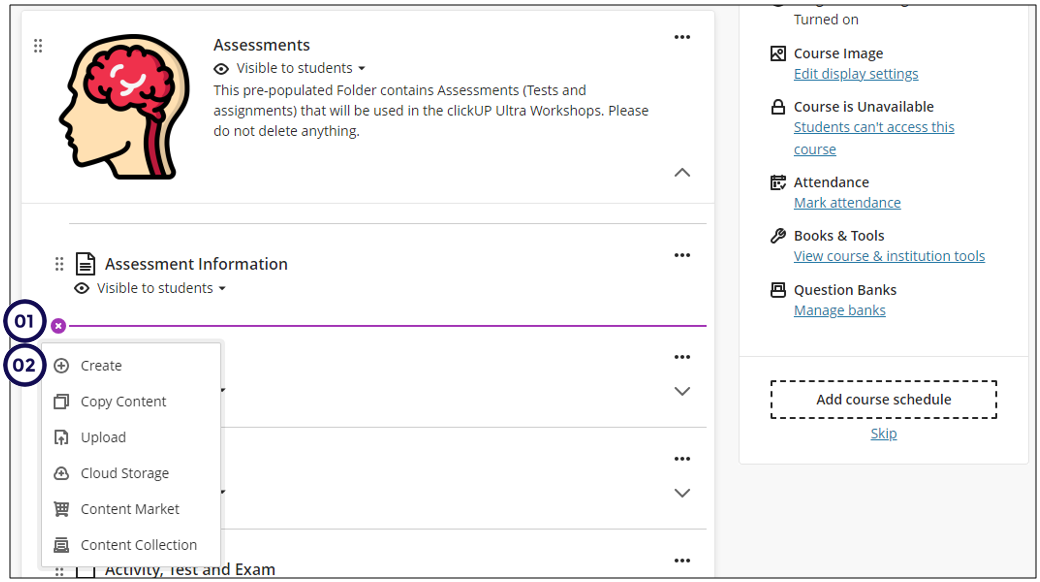
Select the plus sign wherever you want to add an assignment.
-
In the menu, select Create to open the Create Item panel.
-
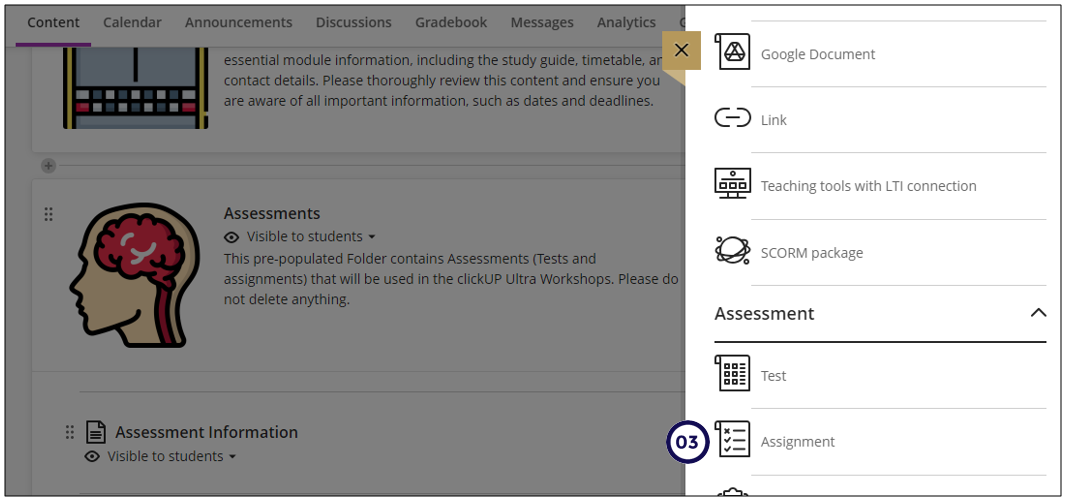
Scroll down and select Assignment.
-
This panel wil open. Add the Assignment name.
-
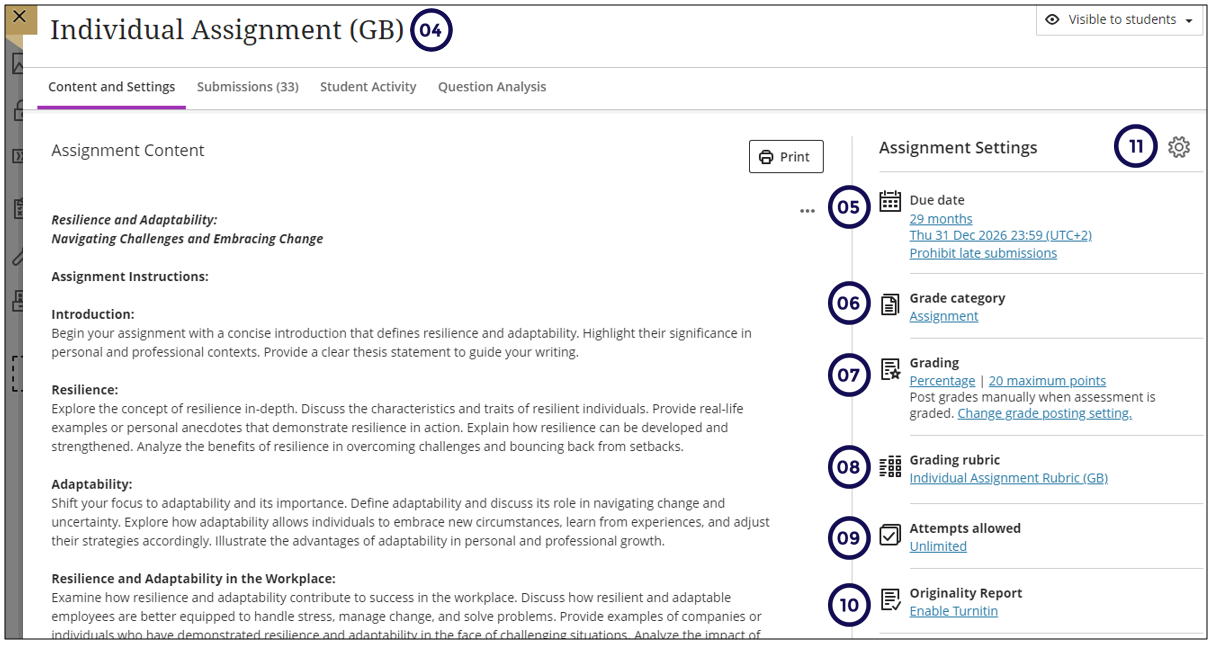
Due Date: Last date and time an assignment can be submitted. The Ultra experience accepts and marks late submissions received after the due date. Students can resume any attempt saved before the due date. Students who submit an attempt after the due date will have their submission marked as late.
Due dates are automatically added to the student's Calendar, Gradebook and their Activity Stream.
If students have submitted attempts, you cannot change the due date to a date in the past. You can only change (edit) it to a date in the future.
- Grade category: You can change the assignment’s Grade category to be part of one of the custom Gradebook categories you set up in your course. You can use the default and custom categories when you set up the Current Grade. Grade categories can be changed at any time.
- Maximum points: Add a number value between 0 and 99,999 for your assignment. If you leave this field blank, the number will default to 100.
- Grading rubric: A rubric serves as a scoring mechanism for assessing graded work. It aids in evaluating student submissions according to predefined criteria. You have the option to generate a new rubric or link to an existing one. Rubrics can only be added to assignments that do not include questions. Read more on Rubrics elsewhere on the help site.
- Attempts allowed: Determine the number of attempts. You can allow your students to submit more than one attempt for an assignment. When you allow multiple attempts, you can also choose how the final grade is calculated: average of all attempts, first attempt with a grade, attempt with highest grade, last attempt with a grade, or attempt with lowest grade.
- Originality Report: You can enable this option to allow the Turnitin similarity report to be generated for this assessment. What this mean is that:
- All files submitted will run through Turnitin to generate a similarity report and AI score.
- You will use the assignment rubric and flexible grading toolbar to grade the assignment.
- Click here to read a document to assist you to make an informed decision as to when you need to use the LTI tool for Turnitin and when it will be sufficient to switch it on here.
- Settings When you click on this icon it will take you to more assignment settings which will be discussed below.
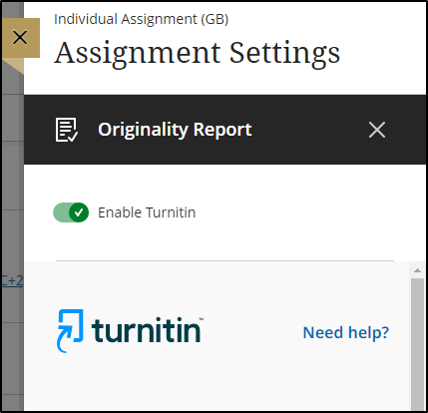
Enable Originality Report
When you select to enable Turnitin, the LTI tool will load with limited options to select from.
Please be patient for these options to display:
-
Store student submissions: decide if you want this assignment submission to be stored on the student or institution repository or not on any repository.
-
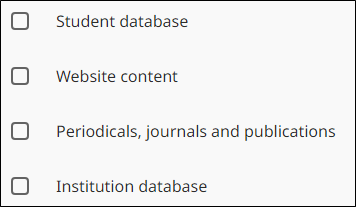
Compare submissions against: select at least one of these options for the comparison:
-
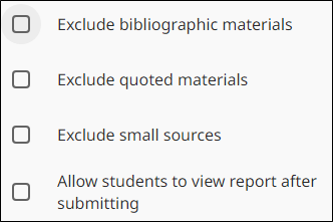
Similarity Report: decide which of these options should be applied to this submission:
It is suggested that you select the tick box to allow your students to view the similarity report so that they can also learn from it.
Assignment Settings
Details and Information
Due date
The final date and time an assignment can be submitted. clickUP Ultra accepts and marks late submissions received after the due date. Students can resume any attempt saved before the due date. Students who submit an attempt after the due date will have their submission marked as late.
Due dates are automatically added to the student's Calendar, Gradebook, and their Activity Stream.
If students have submitted attempts, you cannot change the due date to a date in the past. You can only change (edit) it to a date in the future.
No due date
This is used when the student does not have to submit the assignment on any specific date and time.
Prohibit late submissions
Enforces a hard deadline (overrides the timer) and prevents a late submission. (Students who started late on a timed assessment will not be able to continue with the assessment after the due date. The timer will indicate how much time the student has left until the Due date lapses)
- In-progress and saved (draft) attempts will auto-submit at the due date.
- If the Prohibit late submission option is activated, it will override the extra time setting of the timer.
(Yes, you can now set a timer on an assignment as well) - Students will receive a submission receipt email.
- Specified accommodations are still honored.
- If the due date has passed, you can not select the Prohibit late submission setting.
- Peer review.
- Group submissions.
- Offline submissions.
- LTI tools (e.g. Turnitin, Numbas, Gradescope, etc.).
Prohibit new attempts after due date
Prevent students from beginning a new attempt after the due date. Specified accommodations are still honored.
- Peer review.
- Offline submissions.
- LTI tools (e.g. Turnitin, Numbas, Gradescope, etc.).
Allow class conversations
Students can discuss the assignment with you and their classmates while the assignment is available.
Collect submissions offline
Use this option to assess student work that does not involve uploading a submission, e.g. enter grades into your Gradebook for activities like oral presentations, science projects, acting performances, and artwork presented in person. You can also link a rubric to this assignment.
Formative tools
Formative assessment
Formative assessments track student learning progress and offer prompt feedback to refine instruction and boost student achievement. They assist both lecturers and students in pinpointing strengths and areas requiring additional attention, e.g. weekly quizzes. The Formative label is always visible for instructors in these areas:
- Course content page.
- Test and assignment settings.
- Gradebook Gradable Items and Grades.
- Student overview.
- Student activity overview.
Formative assessments are included in the Gradebook calculations by default, but you can edit the grade calculations and exclude the formative assessments.
You are also able to filter the Gradebook to only show formative assessments.
Display formative label to students
If you select this option, the formative label is visible for students in these areas:
- Course content page.
- Assessment panel before starting an attempt.
- Assessment details & information panel during and after an assessment.
- Assessment header when viewing a submission.
- Gradebook.
If you choose to hide the formative label from students, no indicator about this tool is displayed in any section.
Grading & Submissions
Change the Grade category
You can change the assignment’s Grade category to be part of one of the custom Gradebook categories you set up in your course. You can use the default and custom categories when you set up the Current Grade. Grade categories can be changed at any time.
Attempts allowed
Determine the number of attempts. You can allow your students to submit more than one attempt for an assignment. When you allow multiple attempts, you can also choose how the final grade is calculated:
- average of all attempts,
- first attempt with a grade,
- attempt with highest grade,
- last attempt with a grade, or
- attempt with lowest grade.
Grade using
Select the grading schema. You can change the grading schema at any time and the change will appear to students and in your Gradebook.
Maximum points
Add a number value between 0 and 99,999 for your assignment. If you leave this field blank, the number will default to 100.
Anonymous grading
This setting hides students' names. Student names are not shown during marking. You may only add text and files to anonymously graded assignments.
Evaluation options
Two graders per student
Two graders have to mark the SAME student’s work. Graders cannot see other graders' marks or feedback. They cannot post grades but only provide provisional grades. The reconciler has to review the marks assigned by all assessors to each student and reconcile the marks. Reconcilers can see the marks and feedback of graders, but not the rubrics and annotations. Students only see the marks and feedback from the reconciler. They see nothing from the individual graders.
Read more…
Peer review
Peer review allows students to review their peers’ work through criteria-based evaluation.
Delegated Grading (Ultra Smart Views)
Only available for individual assignments. Read more…
Assessment grade
Post assessment grades automatically
Automatically post a student's grade once grading is completed. Turn the setting off. The best practice is to post all grades once all assignments are graded.
Assessment security
This setting issues an access code to control when students complete an assignment. Access codes are generated randomly by the system. If activated, remember to provide students with the code.
The access code isn't stored anywhere in the system. Students can only receive the access code from you or other staff you choose to give it to. You can change the access code as needed and let students know.
Students can use the same code if they save the assessment and want to return later. Students don't need the access code to view the grades and feedback you post.
Additional Tools
Time limit
Each student has a limited amount of time to submit. Time limits can only be added to individual (not group) assignments.
You CAN NOT edit the time limit after students have started their submissions.
Timer Submission Rules
Work is automatically saved and submitted when time expires
The assignment attempts are saved and submitted automatically when the timer has run out.
If Prohibited late submissions was selected, it will override the timer if the student started late.
Students have extra time to work after the time limit expires
Students can continue with the assessment after the timer ran out. Once the extra time runs out also, the in progress and draft submissions are submitted, EXCEPT when Unlimited extra time is allowed after the timer expired.
If the Prohibit late submission option was activated, it will override the extra time setting of timer.
Submissions over time is NOT indicated as Late on the gradable items view. When you grade assignments, you can see how much extra time each student used to complete the assignment. If questions were added to the assignment, you can also see which questions were answered after the initial time limit. Students also see this same information when they access their graded assignments.
Additional time allows students to reconnect if they lose connectivity during their attempts. You can allow extra time to see if the original time you set is enough for students to do the assignment.
See the visual explanation here on the system actions with various combinations of settings.
Grading rubric
A rubric serves as a scoring mechanism for assessing graded work. It aids in evaluating student submissions according to predefined criteria. You can either create a new rubric or link to an existing one. Rubrics can only be added to assignments that do not include questions. Read more...
Assigned groups
Create an assignment for groups of students. By default, you assign a grade to each group as a whole, but you can change a group member's individual grade.
5.8 “Group assessments give students the opportunity to develop their teamwork skills and improve learning through discussions and collaborative task completion. This could and should be an important part of the learning process but is not recommended as a summative assessment approach because of the integrity issues related to the measurement of individual learning and different levels of participation of group members. Although group assessment and peer assessment reduce the grading workload of teachers, it is not an objective and reliable assessment of individual student competency and should not be used for summative assessment purposes”.
Description
The text you enter here displays to students below the link to the assignment on the Course Content page. This is where you can provide students with more information about the assignment. The maximum length of a description is 750 characters. A warning will appear below the description field when 75 characters or less remain.
Visibility settings of an assignment
Visible to students
The assignment is fully available to students without any restrictions.
Hidden from students
Students cannot see or access the assignment.
Release conditions
Assignment is made available based on set rules. Release conditions allow you to set:
- Who has access to the assignment: all course members or specific groups
- When the assignment is accessible, visible, and hidden, based on date & time or performance on a graded item.
- What students will see before the assignment becomes available:
- Show: The link to the assignment is visible, but students cannot access it yet
- Hide: students do not see the link to the assignment until it is available to access.
You can also expand or create a learning module or folder and add an assignment to it.
When you create an assignment, a gradebook item is created automatically.
After you post assignment grades, students can view their scores on their grades pages or in the activity stream. They can also access an assignment, their submissions, your feedback, rubrics, and their grades from the assignment link on the Course Content page.
Credit to Blackboard Help
